A spelling corrector in Haskell
October 31, 2009 at 03:07 PM | categories: Uncategorized | View CommentsUpdate: Thanks to the commenters on this blog and on Reddit, I've got a much improved and more readable Haskell port of the spelling corrector.
On Wednesday I attended the StackOverflow DevDay in London, which was a day of excellent talks by engaging speakers. Michael Sparks gave a talk on Python, where he built up Peter Norvig's spelling corrector line by line as we watched. I was impressed by how easy it was to understand the source code, and the style struck me as being particularly functional. So, I was compelled to translate the Python source into Haskell.
This post is also a Literate Haskell program, meaning that you should be able to copy the text from the page, paste it into a .lhs file, and compile it. Snippets starting with > are Haskell; in between is Peter's original program, and my commentary on the differences.
 # Python region looks like this:
import re, collections

> -- Haskell region looks like this:
> module Main where
>
> import Char
> import qualified Data.List as List
> import qualified Data.Map as Map
> import qualified Data.Set as Set
> import Data.Ord
> import IO
> import List
Every language needs some imports. The Python program only has two; we're using a scattering of functions outside of the prelude (Haskell's standard library), so we need to import a bit more:
Chargives ustoLowerandisAlphaData.Listgives usfoldl'Data.Mapgives us theMaptypeData.Setgives us theSettypeData.Ordgives us thecomparingfunctionIOgives usisEOFListgives usmaximumBy
def words(text): return re.findall('[a-z]+', text.lower())

> lowerWords = filter (not . null) . map (map toLower . filter isAlpha) . words
The Haskell prelude already has a function called words, which splits a string by spaces. filter isAlpha and filter (not . null) approximate the Python regular expression:
filter isAlphadrops all characters outside of a-zfilter (not . null)excludes any empty strings (such as sequences of numbers or punctuation in the original text)
def train(features):
    model = collections.defaultdict(lambda: 1)
    for f in features:
        model[f] += 1
    return model

> train = List.foldl' (\dict word -> Map.insertWith' (+) word (1::Int) dict) Map.empty
Haskell doesn't need an explicit loop here: we use foldl' to iterate over the list of words and add each one to a map. The Map.insertWith' function either inserts a value (if missing), or extracts the existing value, applies it to a function, and inserts the result back in the map.
NWORDS = train(words(file('big.txt').read()))

> readNWORDS = readFile "big.txt" >>= return . train . lowerWords
A big difference in the Haskell version is that file I/O is encapsulated in an IO monad. So whereas Python's NWORDS variable is an actual dictionary, readNWORDS is a I/O value that, when executed, reads and parses a file and yields a dictionary.
alphabet = 'abcdefghijklmnopqrstuvwxyz'

> alphabet = [ 'a' .. 'z' ]
I put a cheeky shortcut in the Haskell version. (It makes no difference to the line count.)
def edits1(word):
   s = [(word[:i], word[i:]) for i in range(len(word) + 1)]
   deletes    = [a + b[1:] for a, b in s if b]
   transposes = [a + b[1] + b[0] + b[2:] for a, b in s if len(b)>1]
   replaces   = [a + c + b[1:] for a, b in s for c in alphabet if b]
   inserts    = [a + c + b     for a, b in s for c in alphabet]
   return set(deletes + transposes + replaces + inserts)

> edits1 word =
>     let s = [ (take i word, drop i word) | i <- [ 0 .. length word ] ]
>         deletes    = [ a ++ tail b | (a, b) <- s, not $ null b ]
>         transposes = [ a ++ b!!1 : b!!0 : drop 2 b | (a, b) <- s, not $ null b, not $ null $ tail b ]
>         replaces   = [ a ++ c : tail b | (a, b) <- s, c <- alphabet, not $ null b ]
>         inserts    = [ a ++ c : b | (a, b) <- s, c <- alphabet ]
>     in Set.fromList (deletes ++ transposes ++ replaces ++ inserts)
The Haskell and Python versions of this function are fairly close. The main differences:
- Haskell uses the
let...inkeywords to declare values - List comprehension syntax is very similar, if you replace Python's
forandinwith Haskell's|and<-. (Recurring theme: Haskell prefers symbols to keywords.) [ start .. end ]is Haskell's built-in range syntax. It's lazy, and generates elements only on demand, which means it's fine to construct an infinite list like this:[ 1 .. ]- Python has neat string slicing syntax:
[:i]is replaced withtake i, to take the first i characters[i:]is replaced withdrop i, to take all but the first i characters- Subscripts can be replaced with the
!!operators, which does the same thing, but with O(N) complexity. Remember Haskell's strings are lists of characters, not arrays (although seeData.ByteString). - Python's
ifkeyword maps to different things depending on the context. Here it's used to ask 'is the string empty?', and we replace it with thenotandnullfunctions. ++and:stand in for Python's+operator, depending on whether we're concatenating two lists (a ++ b) or pushing a single element onto the start of a list (head : tail)
I'm not totally convinced about the performance of the Haskell version, since take and drop are O(N) and not O(1). However, N is small here, being the length of a word. If it's a problem we could use ByteString instead for O(1) complexity at the price of having to copy strings.
def known_edits2(word):
    return set(e2 for e1 in edits1(word) for e2 in edits1(e1) if e2 in NWORDS)

> known_edits2 knownWords = Set.unions . Set.elems . Set.map (Set.intersection knownWords . edits1) . edits1
Here I replaced the Python list comprehensions with Haskell's built-in set functions. We can't iterate directly over a set in Haskell, so if we used a list comprehension here, we'd to use elems to produce a list from the set and fromList to turn the result into a set again. Here I feel that the Python version demonstrates the intent more clearly, which is to produce a set of edits from edit1, then run those through edit1 again, and keep only the edits that turn out to be real words.
Read from right to left, what the Haskell version does is:
- Produces a set of edits to a word using
edit1 - For each edit in the set, produce another set of edits using
edit1, and keep only those edits-of-edits that can be found inknownWords. We now have a set of sets. - Turn a set of sets into a list of sets, using
elems - Collapse that list of sets into a single set of words using
unions
def known(words): return set(w for w in words if w in NWORDS)

> -- no Haskell equivalent
The known function actually disappears in the Haskell version. Because it takes a set of known words instead of a map of word frequencies, it turns into a direct call to intersection lower down.
def correct(word):
    candidates = known([word]) or known(edits1(word)) or known_edits2(word) or [word]
    return max(candidates, key=NWORDS.get)

> correct nwords word =
>     let knownWords = Map.keysSet nwords
>         candidates = Set.elems
>                    $ head
>                    $ filter (not . Set.null)
>                    $ [ Set.intersection knownWords $ Set.singleton word,
>                        Set.intersection knownWords $ edits1 word,
>                        known_edits2 knownWords word,
>                        Set.singleton word ]
>       in maximumBy (comparing (\w -> w `Map.lookup` nwords)) candidates
Python has a magic short-circuiting or operator, which we have to fake by putting together a list of sets and finding the first non-empty one. Because Haskell is lazy this does in fact short-circuit: for instance, we never make a call to known_edits2 if we can already find word in knownWords.
I'm not a fan of maximumBy in Haskell, which makes you compare two items yourself; I prefer the Python version, which is similar to .NET's OrderBy function. Here, though, the comparing function in Data.Ord makes the code a little less verbose.
Finally, here's a little command-line demo that corrects words the user types in. It's only at this point that the Haskell version touches the text file that the Python program encapsulates in the NWORDS variable; the Haskell version passes the dictionary through each function that needs it. I could have done a direct translation of the Python, but this would have meant writing most of the program as imperative IO monad code, which wasn't really the point of the Haskell translation.
> prompt nwords = do
>     eof <- isEOF
>     if eof
>       then return ()
>       else do
>           getLine >>= putStrLn . correct nwords
>           prompt nwords
>
> main = readNWORDS >>= prompt
Control flow graph v0.1: Tail recursion
August 02, 2009 at 11:34 AM | categories: Compiler | View CommentsIn my last Lisp compiler post, I talked about what I might need to do in order to support tail-recursive calls. I came to the conclusion that my compiler need to start describing the program as a graph of linked basic blocks.
To summarise, a basic block obeys two rules:
- It has a single entry point: the program isn't allowed to branch into the middle of the block
- It has a single exit point: the block always contains a single branch instruction, which appears at the end
For instance, here's a graph of a program that uses a recursive factorial function:
(define (factorial n)
  (if (= n 0)
    1
    (* n (factorial (- n 1)))))
(Console.WriteLine (factorial 6))
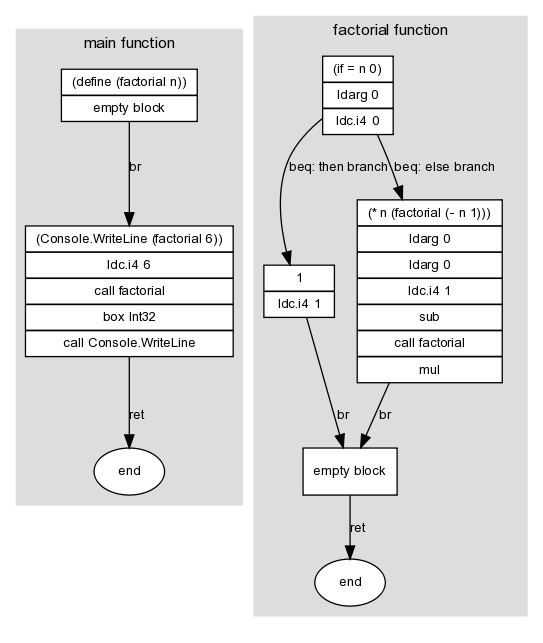
Here I've marked graph edges with a .NET branch instruction (in this case, br, beq or ret). These edges link the graph's nodes -- the basic blocks -- which is where the other instructions in the program appear. A block doesn't need to contain any instructions; for instance, the then and else branches of the if block both lead unconditionally to a single empty block, which in turn exits the function.
To represent the data structures in the graph I added three F# types to the compiler. All of them are immutable apart from ILBlock's Branch field, which I made mutable in order to allow circular references between blocks:
ILOpCode: a discriminated union with one case for each IL opcode that can appear inside a block --Add,Box of Type,Call of MethodInfo, etc. Note thatcallis not considered a branching opcode for these purposes, since it doesn't interrupt the control flow.ILBranchOpCode: a discriminated union with one case for each IL opcode that can appear at the end of a block -Beq of ILBlock * ILBlock,Br of ILBlock,Brtrue of ILBlock * ILBlock,NoBranchandRet. The values forBeqandBrtruespecify both branch possibilities. EachILBranchOpCoderepresents an edge in the graph.ILBlock: a record containing a list ofIlOpCodeand a mutableILBranchOpCodefield. EachILBlockrepresents a basic block; that is, a node in the graph that can be linked by two or moreILBranchOpCodes.
These new data structures now allow me to split the code concerned with IL generation into two parts: a large function that turns the abstract syntax tree into a graph of basic blocks, and a class that takes this graph and uses it to emit IL code through an ILGenerator. (Actually there are two of these classes -- DynamicMethodTarget and MethodBuilderTarget -- because there is no common base between the two classes .NET provides to instantiate an ILGenerator.)
I won't list out the code in full, since I've submitted it to GitHub (CodeGeneration.fs) and because it's got broadly the same structure as the last time I posted it. The difference is that most of the work is performed by a makeBlock function:
val makeBlock : IILTarget -> Map<string, LispVal> -> LispVal -> Map<string, LispVal> * ILBlock * ILBlock
The purpose of this function is to:
- Accept an
IILTarget, an interface capable of defining new methods and local variables; a map, which contains the environment at this point in the program; and aLispVal, which represents one line of code - Return a new environment, which could be modified version of the one passed in; and two
ILBlockinstances, which represent the head and tail of a new subgraph
Normally makeBlock will construct only a single block, in which case both the same block object will be returned twice. An if form is more complicated, in that it consists of a diamond shape: the block that contains the code for the test can branch to either the then or the else block, both of which eventually branch back to the same location so that the program can continue. When generating code for an if, makeBlock will return the blocks at the top and bottom of the diamond, ready to be linked together with the rest of the program. (The edges between the then and else blocks are already added.)
Now the the clever part: because we've got the program's structure and code as a graph in memory, we can do some more interesting optimisations. The process of turning this graph into IL goes as follows:
- Iterate through the graph and assign a IL label to each block. With a depth-first recursive search we have to be careful not to get stuck in a circular reference: to avoid this we keep track of blocks we've already encountered.
- Iterate through the graph again: generate instructions for each block, followed by an instruction for the block's branch
Take a look at the diagram at the top of this post. Because the diagram doesn't assume a particular ordering of the instructions in memory -- for instance, it doesn't specify whether then or else comes first -- some of its branch instructions are redundant. To generate somewhat sensible IL we have to do some basic optimisations in step (2):
- Case A: If step (1) put two blocks next to each other in memory, we don't need to insert a
brinstruction between them. Recall thatbris an unconditional jump instruction; by leaving it out, we cause the program to fall through from one block to the next. - Cases B and C: Likewise, use the ordering of the blocks to drop one of the targets of
beqand replace it with a fall through - Case D: If block branches to its target using
br, and its target contains no instructions and ends inret, insert aretinstruction directly
These rules give us a nice opportunity to use pattern matching -- note how the structure of the code is similar to my explanation above:
// Given a list of blocks:
// - branch is the ILBranchOpCode of the first block
// - otherBlocks is a list containing the rest of the blocks
match branch, otherBlocks with
| Br target, next :: _
    when target = next -> // Case A
    ()
| Beq (equalTarget, notEqualTarget), next :: _
    when equalTarget = next -> // Case B
    generator.Emit(OpCodes.Bne_Un, labels.[notEqualTarget])
| Beq (equalTarget, notEqualTarget), next :: _
    when notEqualTarget = next -> // Case C
    generator.Emit(OpCodes.Beq, labels.[equalTarget])
| Br { Instructions = [ ]; Branch = Ret }, _-> // Case D
    generator.Emit(OpCodes.Ret)
| branchOpCode, _ ->    // None of the above apply
    emitBranch labels branchOpCode
Finally -- and here's what I've been building up to with these last couple of posts -- we can implement tail call recursion, using the tail.call prefix. Our graph data structures allow us to literally look for the situation that the IL spec requires: a call instruction immediately followed by ret. In our case, this happens when a block's branch is Ret, and the last instruction of that block is Call:
let rec emitInstructions block =
    let isRetBlock =
        // A slight hack: due to the above optimisations,
        //  there's a couple of ways of emitting a Ret
        match block with
        | { Branch = Ret } -> true
        | { Branch = Br {
            Instructions = [ ];
            Branch = Ret } } -> true
        | _ -> false
    function
    | [ Call _ as instruction ] when isRetBlock ->
        generator.Emit(OpCodes.Tailcall)
        emitInstruction instruction
    | instruction :: otherInstructions ->
        emitInstruction instruction
        emitInstructions block otherInstructions
    | [ ] ->
        ()
By reorganising my compiler to support tail recursion I've learned that:
- Changing your data structures (in this case, implementing a control flow graph) can often make a previously difficult algorithm (tail call detection) straightforward
- If you haven't got any unit tests, you're not refactoring, you're just changing stuff. I've now written unit tests for the main features supported by the compiler. As an aside, I think NUnit tests written in F# look nicer than their C# equivalents, although I was slightly disappointed that NUnit made me write a class with instance methods, whereas it would have been neater to have some functions for test cases defined directly inside an F# module.
- Writing a blog post on a topic before attempting it is a great way to get your thoughts clear in your head before starting
What I might look at next is some more sophisticated algorithms over the control flow graph. Once you have a graph you make available a whole field of algorithms to use on your data. I haven't looked at it yet in detail, but I like Steve Horsfield's data structure for modelling directional graphs.
Obscure exception handling facts
July 28, 2009 at 08:22 PM | categories: Uncategorized | View Comments(The second in what seems to be a day of obscure .NET facts)
While looking at some C++/CLI code in Reflector today at work, we encountered the try ... fault construct.
What's a fault block?
It's like a finally block, but it's only entered in the event of an exception.
So it's like a catch block, then?
Not exactly:
faultblocks don't have filters likecatchblocks do- At the end of a
faultblock the exception is implicitly rethrown
Supposedly the benefit of a fault block is performance: that throw; statement at the end of a catch block has the same overhead as any other throw statement, whereas finally and fault blocks incur no runtime overhead. The stack is not unwound when a fault block is entered: fault blocks won't appear in the exception stack trace.
Where do fault blocks show up?
In the code the C++/CLI compiler emits in order to make sure that local variables have their destructors called in the event of an exception.
Obscure IEnumerator facts
July 28, 2009 at 07:06 PM | categories: Uncategorized | View CommentsDaniel Fortunov wrote about an obscure use of duck typing in the C# spec for enumerators:
Although it is common to implement [IEnumerable and IEnumerator] when creating an enumerable class, if you were to drop the interfaces but leave the implementation, your class would still be enumerable by foreach. Voila! Duck-typing!
You can take advantage of this fact for a couple of performance tricks, as demonstrated by many of the standard collection classes in the base class library:
- Declare your
IEnumerator<T>implementation as a struct, not a class. This saves you a heap allocation whenMoveNextis called. - Define a
Enumerator<T> GetEnumerator()method on your collection class - Note that you're returning your own struct, not
IEnumerable<T>; this avoids a boxing operation. You'll still need to explicitly implementIEnumerator<T> GetEnumerator(), for people who only have anIEnumerable<T>reference to your collection. These performance tricks don't apply when you're making calls through this interface.
When somebody uses foreach over your collection, the compiler sees a series of MoveNext calls and accesses to the Current property, and it emits code to call these efficiently on your struct.
What's more, the code in your struct's methods is a candidate for inlining by the JIT compiler. The segment of the MoveNext method of System.Collections.Generic.List<T>+Enumerator that can throw an exception is split into its own method, apparently for this reason.
I don't claim any kind of definite performance benefits from using these techniques, but it does look like the language designers put some thought into making it possible to use foreach without incurring any overhead compared to some less elegant method.
What's a control flow graph?
July 26, 2009 at 12:49 PM | categories: Compiler | View CommentsI'd like to add tail call support to my Lisp compiler. I can think of two approaches to tail recursion:
- Use the .NET
tail.callprefix- Translate
callfollowed byretintotail.callfollowed byret - It's easier to spot this pattern if we put IL in our own data structure before emitting it
- Our own data structure needs to represent all the IL we use, including labels (for branching) and local variables
- The label data structure needs a way to represent the target of a branch
- Note: The
tailprefix is a hint that the JIT compiler doesn't have to obey - here's a good explanation of the limitations
- Translate
- Translate functions that call themselves into loops
- Our abstract syntax tree doesn't have a way to represent a loop
- As above, it needs an AST capable of representing branches
- The F# compiler does this; it's not able to rely on the
tailprefix either - Can we apply this to functions that call each other recursively? At compile time we might not spot co-recursive functions: F# only allows co-recursive functions if they use the
let ... andsyntax to define both functions in the same source file.
The ability to represent loops, and control flow in general, seems to be important in your syntax tree. The LLVM approach to this is the basic block:
- One entry point: no branching into the middle of the block
- One exit point: always contains one branch instruction, at the end
- Basic blocks can be connected to form a control flow graph: blocks are vertices, branch instructions are edges
- Control flow graph is: directed (A branches to B); cyclic (A is allowed to branch to A - this is a loop)
How can we represent basic blocks in F#? The intuitive approach means defining a discriminated union:
// An instruction can be a regular opcode,
//  or a branch to another basic block
type Instruction = CallInstruction of MethodInfo * obj
                 | Branch of BasicBlock

// A basic block is a list of instructions
and BasicBlock = BasicBlock of Instruction list
We have to construct a list of instructions before constructing a basic block. But how do we represent the following?
// C# pseudocode
while (true)
    Console.WriteLine("hello");
// F# abstract syntax tree for the above C#
let instructions =
    [
        Call (writeLine, "hello");

        // How can we branch to something we haven't constructed yet?
        Branch ???
    ]
let program = BasicBlock instructions
The answer is to separate identity of basic blocks from the instructions within them. We could assign names or ids to them. Or, since we're writing F# and not Haskell, we could drop immutability:
// F# abstract syntax tree with mutability -
//  note property assignment with <-
let program = new BasicBlock()
let instructions =
    [
        Call (writeLine, "hello");
        Branch program
    ]

program.Instructions <- instructions
LLVM does something similar with its C++ API:
// LLVM equivalent in C++

// 'bb' is a basic block within func_main
BasicBlock* label_bb = BasicBlock::Create("bb", func_main, 0);

// First instruction in bb: call puts("hello")
CallInst::Create(func_puts, const_ptr_8, "", label_bb);

// Second instruction in bb: branch back to bb
BranchInst::Create(label_bb, label_bb);
I'm not yet sure of all the implications for my toy compiler, but already I can see some indications about how to structure the code to allow for optimisations like tail calling:
- Structure the entire program as a graph of basic blocks linked by branch instructions
- Abstract syntax trees can't do everything; instead, they appear as instructions within basic blocks
- Construction of basic blocks must be separate from construction of the instructions within them, so that we can refer to a basic block from one of its own instructions
- As it progresses through compiler passes, the program graph starts looking less functional and more imperative, until it eventually represents actual machine instructions
- I should probably read a compiler textbook
« Previous Page -- Next Page »
Latest blog posts
Archives
- May 2010 (3)
- April 2010 (5)
- March 2010 (1)
- November 2009 (1)
- October 2009 (1)
- August 2009 (1)
- July 2009 (3)
- June 2009 (6)
- May 2009 (3)
- April 2009 (6)